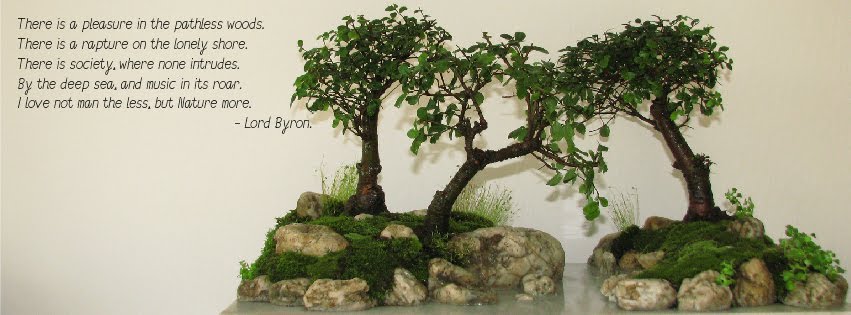
2 years ago I decided that I would like to create one really large penjing with birches, and so in spring I went yamadori hunting and came home with some 8 birches, and these 3 were among them.
After 2 seasons of strong growth the time has come to order custom marble slab (or tray) for them.
Week later and it was brought home with the help of my dad, cause it was pretty heavy, measuring 115x80cm, 2cm wide.
Very next day I started to plan the landscape with the stones I collected from a forest creek near Smolník and I drilled 6mm wide holes for the wires.
After the landscape lines were created to my satisfaction, I used a special paint to make the stones surfaces and the spots where they were meant to be glued rough, otherwise the stones would come off after the next winter. Then the next day after the paint dried out, the time has come to glue the stones to the marble tray with the cement glue, that is usually used for gluing the tiles to the floors and walls of a buildings.
I left it to dry out for a day and the next day in the evening I removed birches from their training pots, trimmed some of the roots (minimal amount of them) and started positioning the trees onto the marble plate right after making the walls of IBUKI keto around the edges and filling the "islands" with pure zeolite, that I use for all of my trees.
I wired the trees to the marble plate and I decided to add one more little tree to the front - but since I haven´t drilled the holes there because I wanted to plant just some small grasses in there, the tree couldn´t be wired and I will have to drill the holes for it later - I am still considering wheter to leave the little tree there, as you should plant the large trees in front to create depth, but interestingly this little tree adds a nice feeling of depth to the piece anyway when seeing it live. I might just move it a bit to the right or left, so it is not in line with the tree at the back.
Applying Keto on top of zeolite (It makes zeolite to keep moisture longer when it is not exposed to the sun directly and the moss sticks to it better than to zeolite itself).
I applied the moss on the keto, watered it thoroughly and left it until 2 days later, when I found some time to make a proper photoshoot for the finished penjing.